Contents
audriga Migration Service moves the contents of your existing mailboxes to your new provider easily, quickly and securely. Configuration is done through a self-service web interface without installing any software; the system connects to the source mailboxes the way your email client does and copies emails, attachments and folders, and, where supported, contacts, appointments and tasks to the target account. Data at the source is not deleted or modified. The migration is set up in three simple steps and its status is monitored online. If you need further support for large or complex migrations, you can contact audriga.
1) Which data is migrated / not migrated?
What can be migrated: Emails, Contacts, Appointments (calendar), Tasks
What cannot be migrated: Public folders, Archives, Journals, Filters/Inbox rules, Signatures, User configurations, Distribution lists, Permissions and Notes
2) Limitations
Main limitations specific to Business Email:
- For events in each user's calendar, the organizer can be the owner of that mailbox.
- Meeting attendee statuses (accepted/declined) are not migrated.
- Internal addresses such as X500 are replaced with valid email addresses where possible; otherwise they are removed.
- Invalid fields (e.g. a faulty URL) do not pass the filter.
- Because Business Email cannot suppress notifications for future changes to recurring events, such changes are not migrated for events with attendees.
- Multiple events with the same UID are not allowed; therefore, copies with the same UID are not transferred.
- Only one event UID per context is allowed. This causes problems if a user has events with the same UID. The Business Email API does not accept them and they cannot be migrated (for example, the customer stored the same event in two different folders).
General limitations:
- Some emails (special MIME formats) may be displayed differently at the destination.
- Some properties of items may not be mapped if they are not supported in the target system.
- Folder permissions may not be migrated one-to-one.
Recommendation: First run a pilot migration with a few mailboxes and verify the result.
3) Preparation
Source and destination access:
- For Microsoft 365, you must use Modern Authentication and define a service account with Impersonation permission.
- On the Business Email side, you add each user with a username + password.
3.1. Setting up Modern Authentication in Microsoft 365 (summary)
- Prepare a service account (a licensed Exchange Online mailbox is required).
Using RBAC, give this account the ApplicationImpersonation role (Exchange Admin Center → Roles → Add role group → ApplicationImpersonation → add the service account as a member → Add). - Register the audriga application in your tenant (run the Admin consent link and approve audriga CloudMovr; the application appears under Azure AD → Enterprise applications).
- Create a “hidden” email group in the tenant (Azure AD → Groups → New group).
The group name/email address contains “audriga” or “birest” (e.g. test-audriga@my-domain.com, mind the letter case). Group type: Microsoft 365. Assign the service account as Owner.
4) Configuring the migration
4.1. Selecting providers
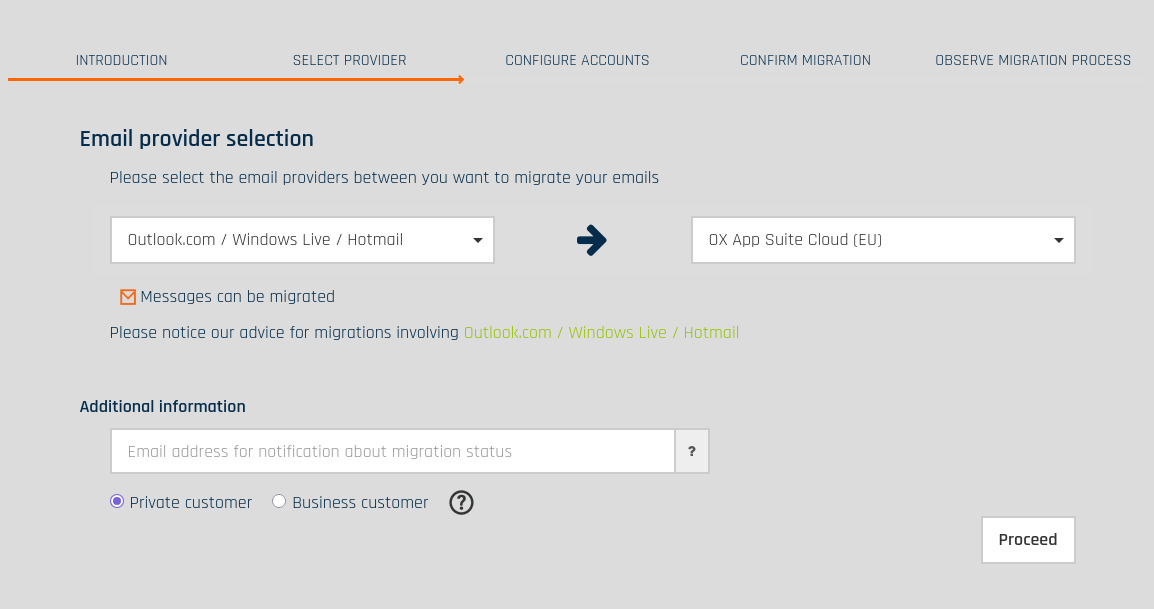
On the start screen, select Microsoft 365 / Exchange Online (Admin) as the Current Provider and Business Email as the Destination (if it does not appear in the list, start typing its name).
4.2. Adding accounts
- Adding a Microsoft 365 account
- Username: Service account username
- Password: The special group email address you just created (e.g. test-audriga@…)
- Details: The mailbox of the user to be migrated

Verify the credentials with Check (a green tick if correct, a red cross if not).
- Adding a Business Email account

- Bulk add (via CSV; a maximum of 50 mailboxes per file is recommended)

Example row structure:
serviceaccount,groupemail,mailbox1,user1@ox,user1oxpassw,
serviceaccount,groupemail,mailbox2,user2@ox,user2oxpassw,
After uploading, all accounts are listed;

The migration service will try to check the capacity of the target accounts. This check may take a while for larger mailboxes. If you do not want to wait, you can continue.

5) Starting the migration
The summary screen shows the number of accounts and the estimated amount of data. You can proceed even if the source analysis has not finished. If necessary, enter a valid voucher code and start the process with Start Migration.

The interface offers a Free trial option to migrate email and groupware data from the last 10 days. You can start by clicking Free trial.
6) Monitoring migration status
For large data volumes, the migration can take hours. The system sends status emails for job submission, start and finish. You can open the status page with the link in these messages and follow progress. Once the job has started, the migration continues in the background even if you close the page and turn off your computer.

A detailed log (Protocol) is available for each account; emails that could not be transferred, for example because of size limits, are listed here.

7) Delta Migration after a domain name transfer / DNS change
When you transfer the domain name to the new provider or update the MX record to point to the new provider, emails may keep going to the old provider for a while because of DNS caching. Delta migration copies the new emails that landed in the old account in the meantime to the destination, after the initial migration is complete and the DNS change has taken effect. We recommend waiting 24–48 hours for DNS propagation.

Was this article helpful?
Thank you for your feedback.
Still stuck? Our support team is here to help. Tell us your question and our experts will help you.