Contents
A Certificate Signing Request (CSR) is an encoded block of text that you send to the certificate authority when you apply for an SSL certificate. A CSR contains your domain name, your organisation and location details, and the public key of the key pair generated on your server. The private key of the same key pair stays on your server and is never shared.
Why Do You Need a CSR?
A Certificate Signing Request (CSR) is required to obtain a certificate from a trusted SSL provider. A CSR is also used to create self-signed SSL certificates. Follow the steps below to generate a CSR code.
Generating a CSR Step by Step
- Log in to your cPanel account.
- In the Security section, click SSL/TLS.

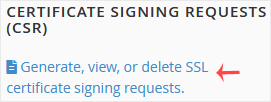
- Under Certificate Signing Requests (CSR), click Generate, view, or delete SSL certificate signing requests.
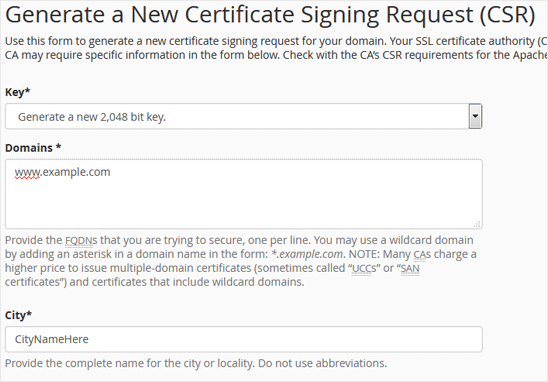
- Scroll down and fill in the following details:
- Domains: Enter your domain name, for example
www.example.com. A domain starting with www usually covers both the www and non-www versions. - City: The name of your city.
- State: The name of your province or state.
- Country: Select your country from the drop-down menu.
- Company: Your company name, or leave it blank.
- Company Division: The relevant department of your company.
- Email: Your email address.
- Passphrase: A passphrase of up to 20 characters without special characters.
- Domains: Enter your domain name, for example
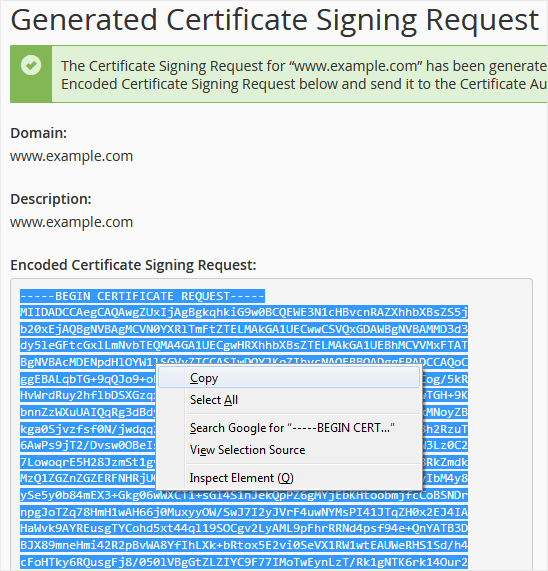
- Click the Generate button. Copy the generated CSR code and save it on your computer. You can use this code when you buy an SSL certificate or reissue your certificate.
Other Details on the Form
When filling in the Generate a New Certificate Signing Request form, keep the following in mind:
- Key: In this field at the top of the form, the Generate a new 2,048 bit key option is selected by default. If you do not have a key you want to use, you do not need to change this option.
- Domains: Enter the fully qualified domain names (FQDNs) you want to secure, one per line. For a wildcard certificate you can add an asterisk in front of the domain name, for example
*.example.com. According to the note on the form, many certificate authorities charge a higher price for multiple-domain (UCC or SAN) and wildcard certificates. - City: Enter the full name of the city or locality; do not use abbreviations.
Using the Generated CSR Code
On the Generated Certificate Signing Request page you will see your domain name, the description and the Encoded Certificate Signing Request field. When copying the code, select the whole text including the -----BEGIN CERTIFICATE REQUEST----- and -----END CERTIFICATE REQUEST----- lines; if these lines are missing, the certificate authority may not accept the code.
After you submit the CSR with your certificate application, the validation process begins. Validation must be completed within 30 days of the application, otherwise the application is cancelled. Once your certificate is issued, you can install it from the same SSL/TLS page.
Was this article helpful?
Thank you for your feedback.
Still stuck? Our support team is here to help. Tell us your question and our experts will help you.