Contents
- 1. First Step: Login and Security
- 2. Main Menu Structure (Webmail Interface)
- 3. Mail Module
- 4. Calendar Module
- 5. Contacts (Address Book)
- 6. Sharing Feature (Business, Business+, Premium, Premium+)
- 7. Email Templates (Premium & Premium+)
- 8. Email and Document Encryption (Premium & Premium+)
- 9. Documents Module (Word/Excel/PowerPoint-Like Templates) (Premium & Premium+)
- 10. Drive Cloud Storage (Premium & Premium+)
- 11. Restoring Emails (Premium & Premium+)
- 12. Artificial Intelligence Features (Premium & Premium+)
Today, an email service is not just about sending and receiving messages; it is our digital office where we manage our workflow, plan our calendar and store our files. With our new-generation Webmail interface (along with Business and Premium package features), we have compiled all the features that will make your life easier in this guide.
Here is what you need to know to use your Business Email Webmail account like a pro.
1. First Step: Login and Security
You can quickly access your Webmail account from anywhere in the world. Login Address: https://mail.mnic.tr/appsuite/
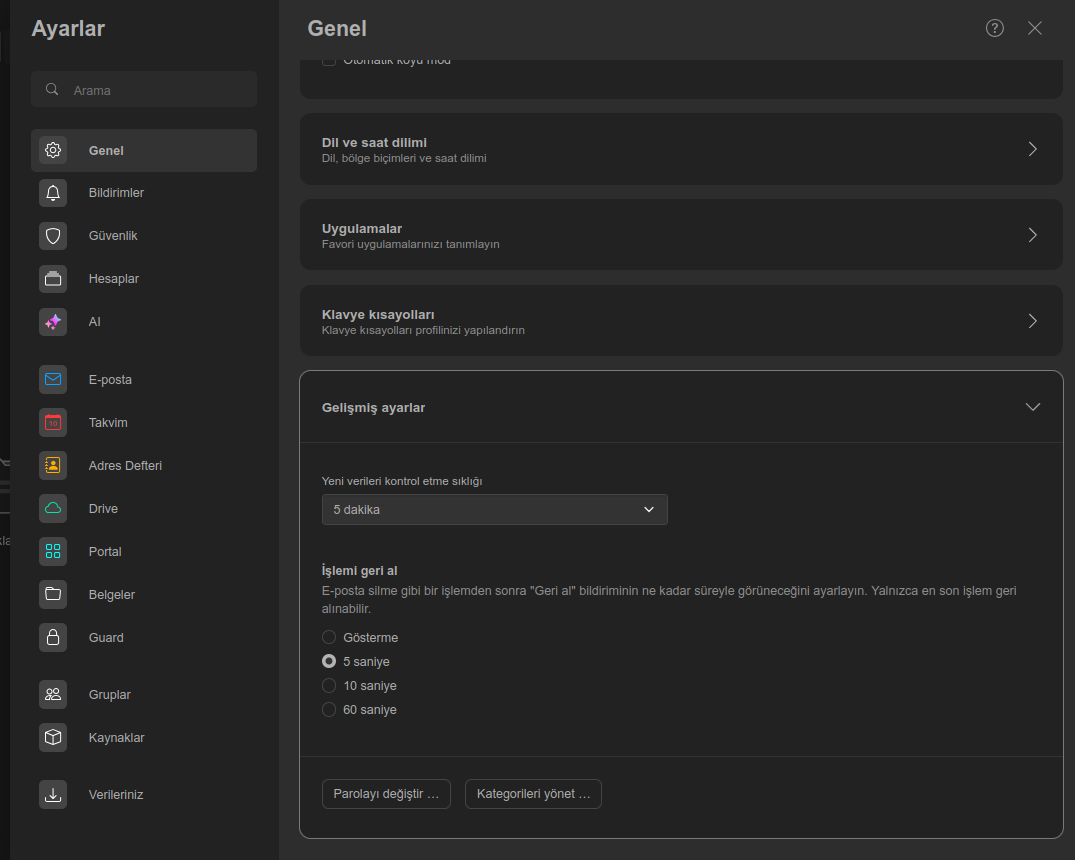
Want to change your password? For your security, we recommend updating your password at regular intervals. After logging in to Webmail, users can set their own passwords by following the steps below:
- Click the Settings icon in the top right corner of the Webmail page. Then click "All settings". The Settings window opens.
- Click "General" in the left pane. Click the "Advanced settings – Change password" button at the bottom of the screen that opens.
- You can update your password on the relevant screen.
2. Main Menu Structure (Webmail Interface)
When you log in to Webmail, the icons in the top left corner are as follows:
- Calendar
- Contacts
- Drive (Cloud Storage) Premium & Premium+
- Documents (Word/Excel/Presentation) Premium & Premium+
3. Mail Module
The mail screen consists of the following sections:
Left Menu: New Email, Inbox, Drafts, Sent, Spam, Trash, Archive
3.1 Sending an Email
To send a new email:
- Click New email.
- Enter the recipients' email addresses in the To field.
- While you type, matching suggestions will be displayed. To accept a suggestion, click it. To accept the first suggestion, press the Enter key.
- To select a contact from an address book, click the Select contact icon on the right side of the input field.
- To send a copy to other recipients as well, click CC or BCC at the top right.
- If you want all recipients to see who the copy of the email is sent to, enter the recipients in the CC field.
- If you do not want all recipients to see who the copy of the email is sent to, enter the recipients in the BCC field.
- Enter a subject. Write the body of the email.
- Click Send.
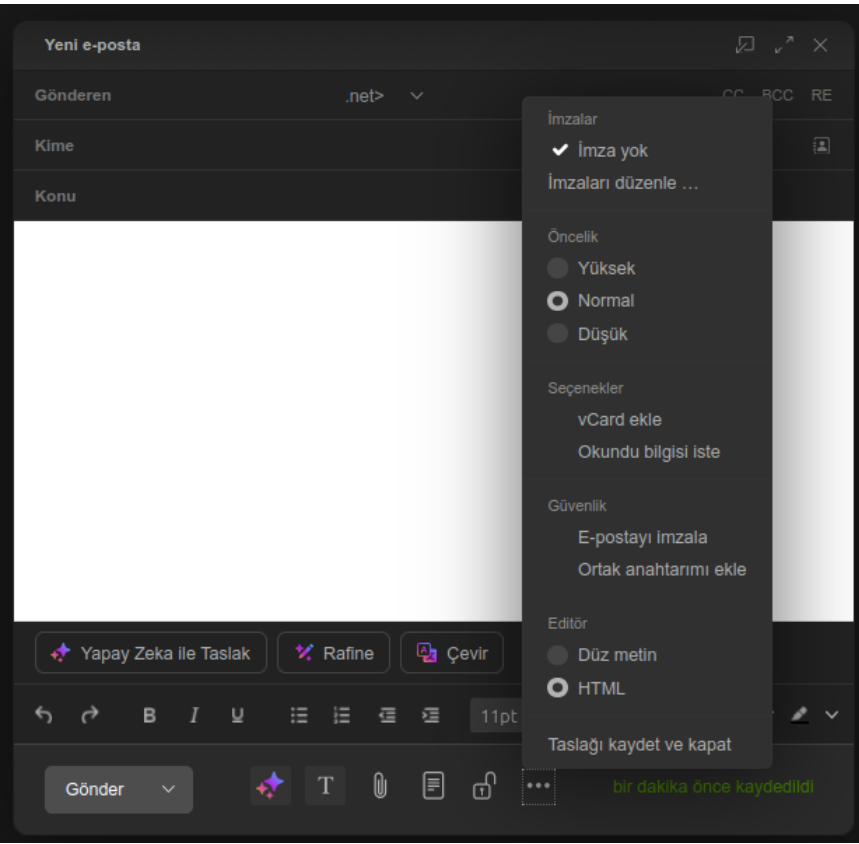
- You can also use other options by clicking the Options icon in the button bar:
- add a signature
- set the priority
- attach a vCard
- request a read receipt
- You can also use other options by clicking the Options icon in the button bar:
3.2 Scheduled Email Sending (Business, Business+, Premium, Premium+)
New Email → the down arrow next to the Send button → "Select Date and Time"
- Usage:
- The email is composed
- Click the small arrow next to the Send button
- Select "Select Date and Time"
- Select the time → click Schedule Email
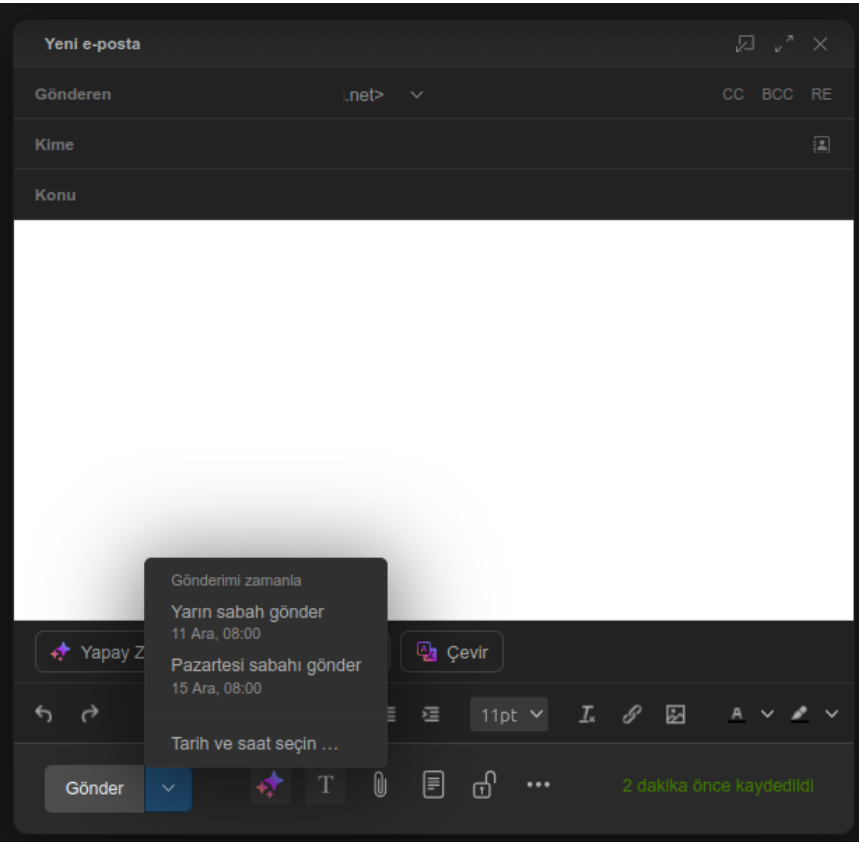
To change the time the email will be sent:
- Open the email in the Scheduled folder.
- Click the Edit draft icon in the toolbar
- Click the Send later icon at the bottom. The email editing window opens. Change the time.
To cancel sending:
- Open the email in the Scheduled folder.
- Click Cancel sending above the email text. The email is moved to the Drafts folder.
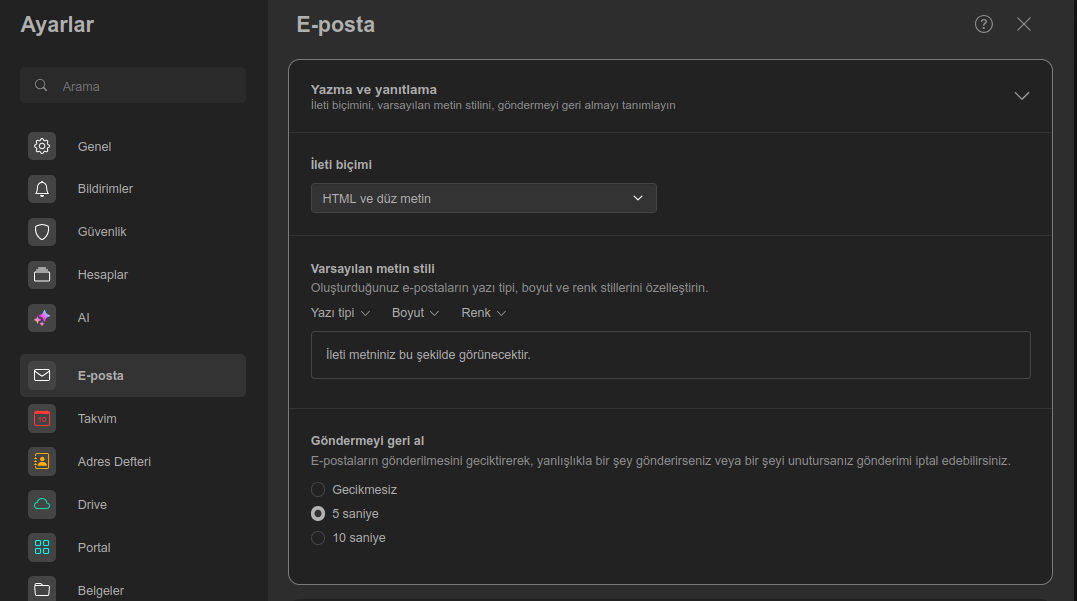
3.3 Undoing a Sent Email (Undo Send)
Right after sending, an "Undo send" button appears on the screen.
Technical logic:
- The system sends the email with a delay of a few seconds.
- The user can "Cancel" within this time.
Changing how long the undo button is displayed
- The mail screen is opened.
- Click the "Settings – All settings" headings in the top right corner of the page.
- Select the "Compose and reply" heading.
- In the menu that opens, under the "Undo send" heading, choose the preferred option from "No delay – 5 sec – 10 sec".
3.4 Email Filtering and Forwarding Rules
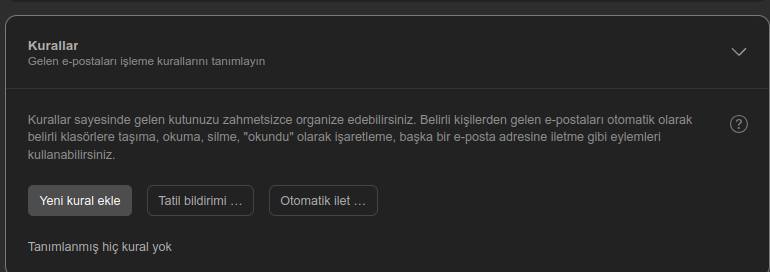
With rules, you can organize your inbox effortlessly. You can use actions such as automatically moving emails from specific people to specific folders, reading them, deleting them, marking them as "read", or forwarding them to another email address.
The options are: Add new rule — Vacation notice — Auto forward.
Filtering Emails
- The mail screen is opened.
- Click the "Settings – All settings" headings in the top right corner of the page.
- Select the "Rules" heading.
- Click "Add new rule".
- On the screen that opens, you can create your filtering preferences to filter your incoming mail using the "Conditions" and "Add action" headings.
You can set up:
- Move incoming email to a folder
- Automatic forwarding
- Block specific senders
- Add a label
4. Calendar Module
Calendar view types:
- Daily
- Weekly
- Monthly
Creating an Event
- Click Calendar → "New Event".
- The following information can be entered on the screen that opens:
- Title
- Date/Time
- Participants
- Reminder
- Location
Subscribing to your Google calendar:
- Click the More actions icon next to New appointment. Click Subscribe to Google calendar.
- You can also click the Settings icon in the menu bar. Click Subscribe to Google calendar.
- A new browser window opens. Follow the instructions to grant access to your Google calendar. The appointments are imported into a new calendar.
Options:
- To refresh the subscribed data, click the Actions icon next to the new calendar. Click "Refresh this calendar".
5. Contacts (Address Book)
5.1 Adding a Contact
- Address Book → Contacts → New Contact
- Fields:
- Name
- Phone
Category: Groups such as "Finance", "Sales" and "Support" can be created.
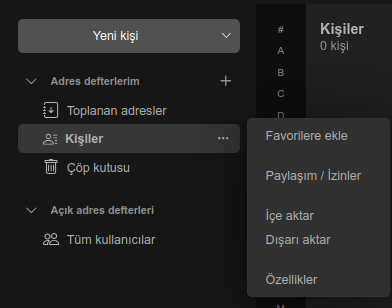
5.2 Exporting / Importing
Importing contacts from a file:
- In the folder view, select the address book into which the contacts will be imported.
- Click the Actions icon next to the address book.
Click Import. - In the Import from file window, select the format you want. Click Upload file. Select a suitable file.
- Click Import.
Exporting all contacts in an address book:
5.3. Exporting all contacts in an address book:
- In the folder view, select a personal or shared address book.
- Click the Actions icon (…) next to the folder name. Click Export. The Export folder window opens.
- Select a format. To export contacts and distribution lists, enable With distribution lists.
- Click Export
Result: A vCard or CSV file containing the exported contacts will be created in the download folder.
6. Sharing Feature (Business, Business+, Premium, Premium+)
Items that can be shared:
- Calendar
- Contact list
- Specific folders
- Drive files
Usage:
For example, after an event is added to the calendar, click the three-dot icon to the right of the title → Sharing / Permissions → Select user → Grant permission → Save
You can use the following options:
- To set permissions, change the user role or click Details.
- To revoke access to a shared item, click the Actions icon next to a person's name.
Click Remove access. - To remove all permissions for an item and the public link, click Remove sharing.
7. Email Templates (Premium & Premium+)
They can be created in two different ways.
- Mail → Mail Settings → "Templates" → Add New Template
- New Email → On the screen that opens, click the "templates icon" → Templates → Edit Templates → Add New Template
To use ready-made template examples:
- Click the "Templates icon" in the top left corner.
- Ready-made templates are available on the screen that opens.
- Click the selected ready-made template, and it can be edited according to the user's needs.
Example use cases:
- Proposal email
- Confirmation email
- Thank-you email
- Corporate announcement
8. Email and Document Encryption (Premium & Premium+)
Encrypting Email Content
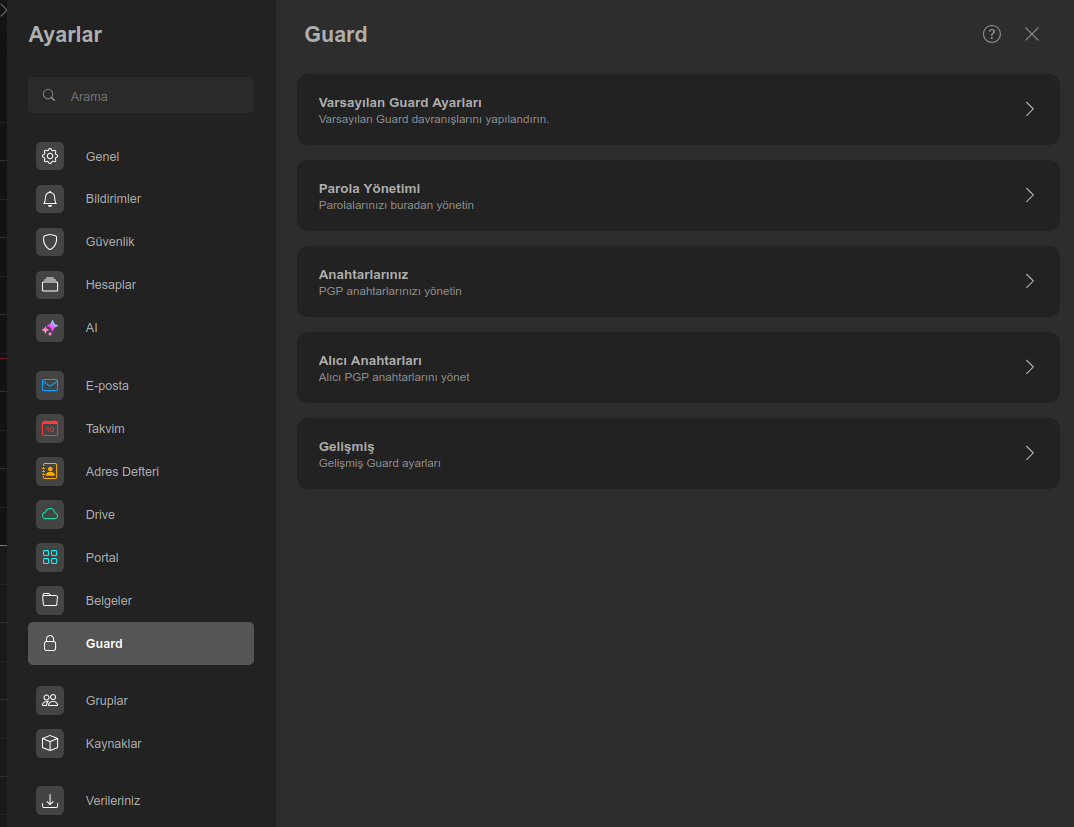
Click Settings at the top right → All settings → click the "Guard" heading in the left menu → encryption preferences can be set on the screen that opens.
When configuring the Guard settings for encryption, a "secondary email" address must be entered. If the Guard password is forgotten, clicking the "Reset Password" button sends a password reset email containing the new password to the secondary email address.
To encrypt while sending an email:
New Email → Click the lock icon on the screen that opens.
If a Guard password has been created, the email is sent encrypted directly. If a password has not been created, clicking the "Start Setup" button redirects you to the "Guard" screen.
Reading an encrypted email:
- In the list view, select an email with the Encrypted icon. A Secure Email notice is displayed in the detail view.
Click Read email. The Password required window will be displayed.
Note: If you previously asked Guard to remember your security password after entering it, the email will be displayed immediately in plain text. - Enter your Guard security password.
You can set how long the Guard security password will be remembered. To do this, select a time interval under Ask for password again.
You can define a default value for the time interval in the Default Guard Settings section of the Guard settings. - Click Confirm. The content is shown as plain text.
If the email has attachments, functions for using the decrypted or encrypted versions of the attachments will be displayed.
What does it provide?
- The email content can only be opened by the recipient
- The password can be set automatically or manually
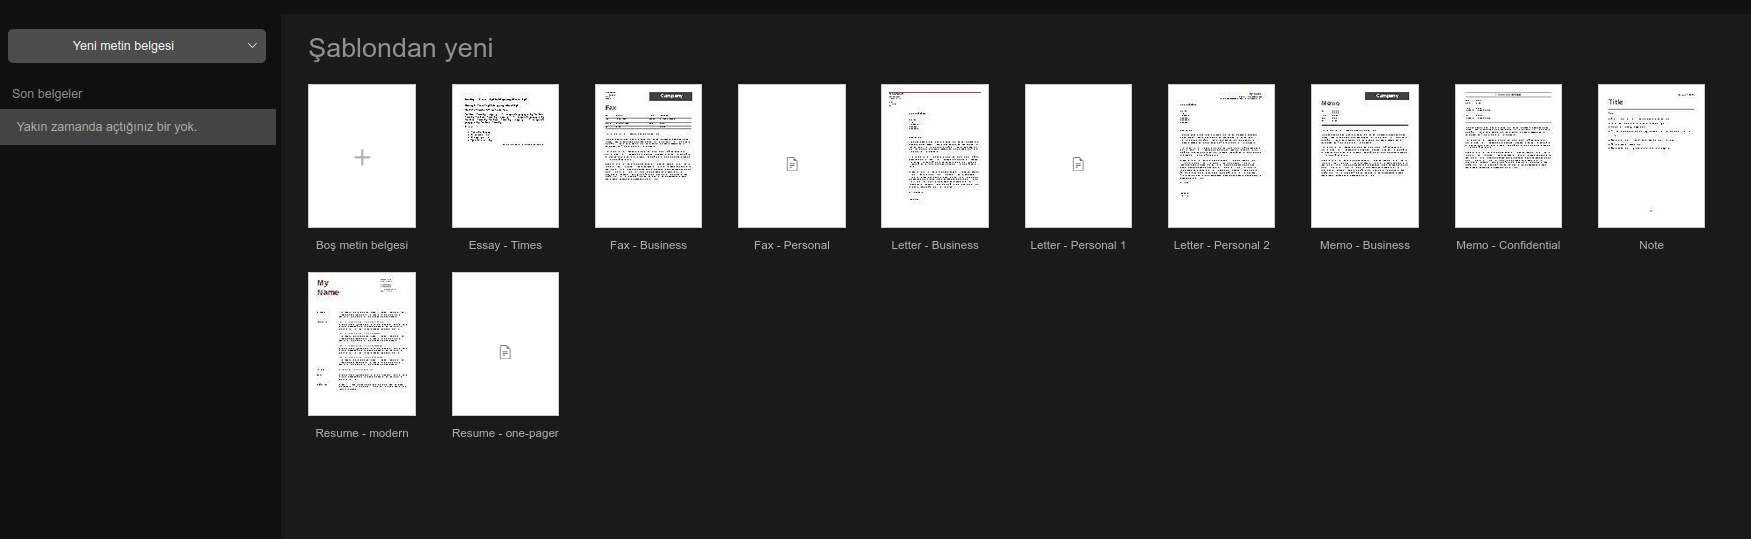
9. Documents Module (Word/Excel/PowerPoint-Like Templates) (Premium & Premium+)
Creating a Document
Click the three-line menu in the top left corner of the page, and select and create the desired document type from the menu that opens.
- Text Document
- Spreadsheet
- Presentation
Collaboration
A document can be opened by more than one person at the same time. Real-time editing is possible
Sharing:
Document → Share icon → People can be added and authorized.
10. Drive Cloud Storage (Premium & Premium+)
Uploading Files
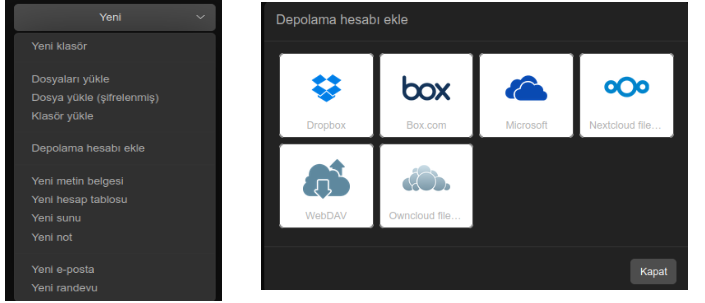
A drive account can be added in 2 different ways.
- Drive → Click the arrow to the right of the New button → Add storage account
- Drive → Click the settings icon in the top right corner → Add storage account
Sharing Files
Drive → File → Right-click → Sharing / Permissions
- A link can be shared
- A password can be set
- An expiry date can be added
Encrypting a Drive file:
- Open the shared file you want to encrypt via Drive → My Files.
- Right-click the file.
- Select the "Encrypt" option from the options that open. The file is encrypted by entering the Guard password.
The file is encrypted with the "Guard" password you created. If there is no Guard password, clicking the "start setup" button redirects you to a screen where a password can be created.
11. Restoring Emails (Premium & Premium+)
Ways to recover a deleted email:
Trash → Right-click the trash folder or click the three-dot icon next to it → Select the Restore option.
Recovering permanently deleted emails
Trash → Right-click the trash folder or click the three-dot icon next to it → Click Recover deleted items.
12. Artificial Intelligence Features (Premium & Premium+)
AI-powered functions:
- Automatically drafting emails ("Write this in a professional tone")
- Summarizing long emails
- Language check
- Email subject line suggestions
Was this article helpful?
Thank you for your feedback.
Still stuck? Our support team is here to help. Tell us your question and our experts will help you.