Contents
Instead of using an FTP program to upload your files, you can use cPanel's built-in File Manager.
File Manager is a cPanel tool that lets you view and manage the files and folders in your hosting account from your browser. You do not need to install a separate program on your computer; you can upload your website's files, create new files or folders, and copy, move and download files.
Uploading a File Step by Step
The steps below let you upload a file from your computer to your website's directory:
- Log in to your cPanel account.
- In the Files section, click File Manager.

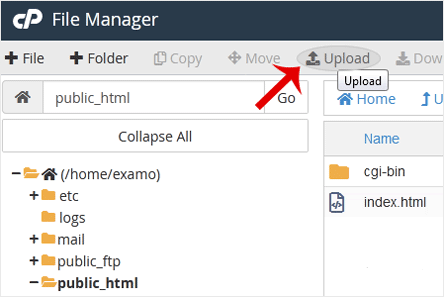
- Go to the directory you want to upload your files to. For example, to upload your files to the
/public_htmldirectory, double-clickpublic_htmlin the directory tree on the left.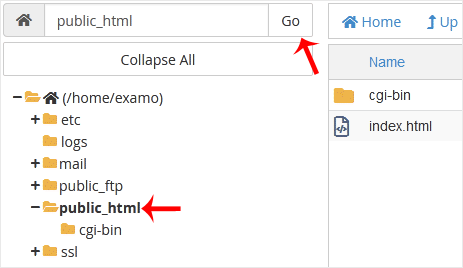
- Click the Upload button.
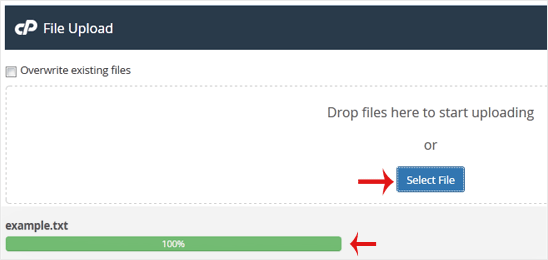
- Click Select File, choose the file you want to upload from your computer and click Open; the upload starts. You can also drag and drop files from your computer into the upload area.
Options on the Upload Screen
At the top of the File Upload screen there is an Overwrite existing files checkbox. If a file with the same name as the one you are uploading already exists in the directory and you want the old file to be replaced with the new one, tick this box. Before ticking it, make sure you no longer need the old file.
During the upload, the file name and a progress bar appear at the bottom of the screen. When the bar reaches 100%, the upload is complete. You can then return to File Manager and check that the file is in the right directory.
The public_html Directory and Other Folders
public_html is your website's root directory; the files visitors see through your domain name are in this folder. For example, your site's home page is usually the index.html or index.php file in this directory.
In the directory tree on the left you will also see other folders such as etc, logs, mail, public_ftp and ssl. These folders are used to run your account and your email service; if you do not know what they are for, do not change or delete the files in them. To go to a directory quickly, type its path in the address field at the top and click Go, and close open folders with Collapse All.
Tips
- If you are uploading many files, put them in a single ZIP archive on your computer and upload it, then right-click the archive in File Manager and open it with Extract.
- Before overwriting an existing file, download the old file to keep a backup.
- For very large files or regular bulk transfers, an FTP program may be more practical.
Was this article helpful?
Thank you for your feedback.
Still stuck? Our support team is here to help. Tell us your question and our experts will help you.